نوشته شده توسط : lily

We received a problem from our customer when he wanted to use Yanhua Digimaster 3 to adjust mileage for his 2005 Toyota Corolla. Here share the relevant solution with you. Hope helps you.

Digimaster-3-change-mileage-on-2005-Toyota-Corolla

Problem:

I don’t know how to use. I tried to adjust odometer on Toyota Corolla. First ask me device module 2 keep says can’t find the device. Can you tell me how to do it simply?

Solution:

Open Odometer Correction Tool Digimaster 3 home page

Select “Meter System”-> “Asia”-> “Toyota”

Choose the corolla 2005 vehicle model and enter next step

The system will prompt what chip is.

Find the car chip and check whether it is consistent with the prompt or not

If it is, disassemble it and weld to OBP adapter

Connect with digimaster 3 to read data

And follow the prompt to change mileage

Done!


:: برچسب‌ها: Yanhua digimaster3 ,
:: بازدید از این مطلب : 215
|
امتیاز مطلب : 0
|
تعداد امتیازدهندگان : 0
|
مجموع امتیاز : 0
تاریخ انتشار : جمعه 15 اسفند 1399 | نظرات ()
نوشته شده توسط : lily

GM’s new Digital Vehicle Platform found in the C8 requires new dealership diagnostic tool.

The Next Generation Digital Vehicle Platform, GM’s all-new electronic platform that will power the next generation of GM models and systems, including electric vehicles, active safety systems, infotainment systems, and a variety of connectivity features, will first be used on the new 2020 Chevrolet Corvette, Cadillac CT5 and CT4.

The Next Generation Digital Vehicle Platform can incorporate up to nine high-speed CAN buses. Programming and scan tool data information is provided using CAN buses 6 and 7, which only run between the DLC and the Serial Data Gateway Module, and are used by GDS 2 to provide system data from the other CAN networks.

For diagnosis and programming a vehicle with a Next Generation Digital Vehicle Platform, the EL-52100 MDI 2 (Multiple Diagnostic Interface) must be used. (Fig. 8) Module programming, configuration or setup using the EL-47955 MDI 1 cannot be completed on Next Generation Digital Vehicle Platforms because it does not have the capability to complete programming or setup procedures on the new electronic platform. Using an MDI on these vehicles could result in erroneous data or failed programming events that could lead to unnecessary module replacement.

New-C8-Diagnostic-Tool-Required-For-Dealerships

TIP: The Next Generation Digital Vehicle Platform requires the vehicle to be in a Key Off power mode in order to successfully perform an SPS event. Be sure to follow the onscreen vehicle programming prompts closely while performing an SPS event.

An GM MDI 2 kit (EL-52100) is available for purchase at the Special Service Tools website, gmtoolsandequipment.com, or by calling 1-800-GM-TOOLS.

The EL-52100 MDI 2 kit includes:

MDI 2 Unit
SAE J1962 DLC Cable
10-ft. USB A to USB B Cable
Ethernet Cable
D-Link Wireless USB Adapters (Dongles) (Optional; for wireless connection)


:: بازدید از این مطلب : 224
|
امتیاز مطلب : 0
|
تعداد امتیازدهندگان : 0
|
مجموع امتیاز : 0
تاریخ انتشار : جمعه 15 اسفند 1399 | نظرات ()
نوشته شده توسط : lily

GM’s new Digital Vehicle Platform found in the C8 requires new dealership diagnostic tool.

The Next Generation Digital Vehicle Platform, GM’s all-new electronic platform that will power the next generation of GM models and systems, including electric vehicles, active safety systems, infotainment systems, and a variety of connectivity features, will first be used on the new 2020 Chevrolet Corvette, Cadillac CT5 and CT4.

The Next Generation Digital Vehicle Platform can incorporate up to nine high-speed CAN buses. Programming and scan tool data information is provided using CAN buses 6 and 7, which only run between the DLC and the Serial Data Gateway Module, and are used by GDS 2 to provide system data from the other CAN networks.

For diagnosis and programming a vehicle with a Next Generation Digital Vehicle Platform, the EL-52100 MDI 2 (Multiple Diagnostic Interface) must be used. (Fig. 8) Module programming, configuration or setup using the EL-47955 MDI 1 cannot be completed on Next Generation Digital Vehicle Platforms because it does not have the capability to complete programming or setup procedures on the new electronic platform. Using an MDI on these vehicles could result in erroneous data or failed programming events that could lead to unnecessary module replacement.

New-C8-Diagnostic-Tool-Required-For-Dealerships

TIP: The Next Generation Digital Vehicle Platform requires the vehicle to be in a Key Off power mode in order to successfully perform an SPS event. Be sure to follow the onscreen vehicle programming prompts closely while performing an SPS event.

An GM MDI 2 kit (EL-52100) is available for purchase at the Special Service Tools website, gmtoolsandequipment.com, or by calling 1-800-GM-TOOLS.

The EL-52100 MDI 2 kit includes:

MDI 2 Unit
SAE J1962 DLC Cable
10-ft. USB A to USB B Cable
Ethernet Cable
D-Link Wireless USB Adapters (Dongles) (Optional; for wireless connection)


:: بازدید از این مطلب : 241
|
امتیاز مطلب : 0
|
تعداد امتیازدهندگان : 0
|
مجموع امتیاز : 0
تاریخ انتشار : جمعه 15 اسفند 1399 | نظرات ()
نوشته شده توسط : lily

CK Auto Exclusive specializes in service and repair of newer model Mercedes-Benz cars and trucks, but you knew that. Do you find yourself asking how we provide excellent service and hospitality, all while smoothing over your Mercedes-Benz problems quickly and efficiently, though? Well, it’s because we keep up with the latest Mercedes-Benz technology available on the market today.

Owned and operated by master technician Paul Duckworth, CK Auto Exclusive truly is your dealership alternative. When other Mercedes mechanics have an issue that they can’t resolve, Paul is the one they call. CK Auto Exclusive is your Mercedes Benz Expert, and our Mercedes diagnostic tools make us a step ahead of the competition, and the dealership.

At CK Auto Exclusive, we are passionate about Mercedes-Benz vehicles and helping our customers with their repairs, maintenance, and service. CK Auto’s Mercedes-Benz computer is called the XENTRY Diagnosis System – Kit 3. It is the latest and newest version of the SDS Star Diagnostic System. It is exclusive to Mercedes-Benz, and CK Auto Exclusive is the only Mercedes Benz shop in Santa Rosa that has one. The aftermarket scanners only do a fraction of the diagnosing and none of the coding for new electronic parts.
WHAT IS XENTRY?

Let’s first explain what Star Diagnostic SD (C3 or C4 SD Connect) tool is. This is the diagnostic scanner that is used at Mercedes-Benz dealerships and some auto repair shops. It can also be purchased by independent shops. These scanners include the hardware and Xentry which is the software that is used to troubleshoot the problems in any Mercedes-Benz. Original units can be purchased at STAR Tekinfo which is the official Mercedes-Benz site that offers technical documents, special tool, and diagnostic software.

Mercedes-Benz Scanner MB-Star Diagnostic allows you to read and erase fault codes from any control unit in your Mercedes-Benz. With Star Diagnostic scanner you can read the actual configurations in each system, stream real-time sensor data, activate sensors and perform SCN online, SCN offline coding and programming.

When purchasing these sorts of scanners, it is extremely important to ensure that you are buying a true SDS Scanner, as many resellers can claim their product to be an original SDS Scanner when in reality it is just a cheap knockoff.

The XENTRY Diagnosis System – Kit 3 SDS Star Scanner is used by the dealer (or private Mercedes shop) allowing CK’s master mechanics to troubleshoot any system or control system in your Mercedes-Benz.

Activate any sensor in the car
Perform initiation test
Stream live sensor data
Read and clear fault codes
Perform SCN coding

ALL MB SD CONTROL UNITS ARE ACCESSIBLE:

ECU
Read/Delete Faults
Live Data
Sensor Actuation
Read Current Configurations
Initialization
ABS
Airbags
SRS/ SRS Lights
Aircon
Immobilizer
Keyless Entry
and the rest of the +40 remaining control units in Mercedes-Benz cars

In order to use the Star Diagnostic System with Xentry for Mercedes-Benz diagnostic scanner properly, you need to learn how to use the Xentry software. While reading and clearing fault codes is not very difficult, anything besides that requires that you have proper training. Yes, you need proper certifications to operate the software. While you can definitely find instructions online on how to perform certain programming using Xentry if you don’t perform the programming accurately you will cause more problems than you solve.

Luckily, Paul Duckworth is a certified Mercedes master mechanic, making CK Auto Santa Rosa’s best dealership alternative, hands down. Paul has taken all the necessary pieces of training and received the same certifications and teachings that Mercedes-Benz mechanics receive that work directly at the dealership. Paul once worked for a Mercedes-Benz dealership, so knowing that Paul’s passion for Mercedes runs deep, he also knows a thing or two about how dealership mechanics work as well.


:: بازدید از این مطلب : 244
|
امتیاز مطلب : 0
|
تعداد امتیازدهندگان : 0
|
مجموع امتیاز : 0
تاریخ انتشار : پنج شنبه 7 اسفند 1399 | نظرات ()
نوشته شده توسط : lily

In this instruction, Obd2tool.com will show you guide on how to use AVDI diagnostics to do all keys lost programming for Toyota 2016 Yaris Hybrid.

The procedure itself allows you to reset the immobilizer and program keys without having to take it out.

Software used:

Abrites Diagnostics for Ford

TN008-Advanced diagnostic functionality and key programming(incl. Mechanical H keys)

AMS-Annual Maintenance Subscription

Hardware used:

AVDI-Abrites Vehicle Diagnostic Interface

ZN069(ZN067 and ZN068)- Toyota mechanical key(H-type) adapter set

AVDI-Diagnostics-All-Keys-Lost-Programming-by-OBD-for-Toyota-Yaris-Hybrid-1

Procedures:

Start by opening the Toyota software and run the key learning function, click “OK”

AVDI-Diagnostics-All-Keys-Lost-Programming-by-OBD-for-Toyota-Yaris-Hybrid-2

Click “Yes”

AVDI-Diagnostics-All-Keys-Lost-Programming-by-OBD-for-Toyota-Yaris-Hybrid-3

Please confirm following conditions:

Key is in ignition

Ignition is OFF

Driver’s door is open

Click “OK”

AVDI-Diagnostics-All-Keys-Lost-Programming-by-OBD-for-Toyota-Yaris-Hybrid-4

Click “Yes”

AVDI-Diagnostics-All-Keys-Lost-Programming-by-OBD-for-Toyota-Yaris-Hybrid-5

We first try with the ZN068 adapter. ZN068 is directly connected to the AVDI. IGN is switched ON using the key blade and the ZN068.

AVDI-Diagnostics-All-Keys-Lost-Programming-by-OBD-for-Toyota-Yaris-Hybrid-6

At this point the ZN067 adapter is connected to the AVDI.

AVDI-Diagnostics-All-Keys-Lost-Programming-by-OBD-for-Toyota-Yaris-Hybrid-7

The KSW is disconnected from the IGN lock and connected to ZN067

AVDI-Diagnostics-All-Keys-Lost-Programming-by-OBD-for-Toyota-Yaris-Hybrid-8

AVDI-Diagnostics-All-Keys-Lost-Programming-by-OBD-for-Toyota-Yaris-Hybrid-9

After that, the immobilizer IGN and +B fuses are disconnected. And the fuse adapters connected to the e box.

The immobilizer reset procedure when using the ZN067 requires the immo box IGN and BAT(=B) fuses to be removed at this point and the fuse adapters connected(orange- IGN, yellow- BAT). Those fuses are to be found inside the fuse box and can be identified using the live data option in diagnostics by taking the fuses out one by one and observing the IGN and +B indicatiors.

The fuses with lowest amp values are the correct fuses if one or more make a change in the IGN and +B indicators.

Looking at the +B indicator.

This 30A fuse cuts power to the immobilizer but it’s not the one that’s needed.

AVDI-Diagnostics-All-Keys-Lost-Programming-by-OBD-for-Toyota-Yaris-Hybrid-10

This 5A fuse also cuts power to the immobilizer and is a lower value.

AVDI-Diagnostics-All-Keys-Lost-Programming-by-OBD-for-Toyota-Yaris-Hybrid-11

Meaning the yellow fuse adapter cable will go into its place.

Now looking at the IGN indicator.

This 10A fuse cuts the IGN in the immobilizer

AVDI-Diagnostics-All-Keys-Lost-Programming-by-OBD-for-Toyota-Yaris-Hybrid-12

Meaning the orange fuse adapter(IGN) cable will go into its place.

Connect the IGN fuse adapter, followed by the +B fuse adapter

AVDI-Diagnostics-All-Keys-Lost-Programming-by-OBD-for-Toyota-Yaris-Hybrid-13

Once the ZN067 is set up properly, you can continue.

Secret key found! Please connect ZN068 to AVDI and move forward with the procedure. Click “OK”

AVDI-Diagnostics-All-Keys-Lost-Programming-by-OBD-for-Toyota-Yaris-Hybrid-14

The secret key has been found and the ZN068 can emulate a master key.

Returning all fuses and KSW as they were before.

AVDI-Diagnostics-All-Keys-Lost-Programming-by-OBD-for-Toyota-Yaris-Hybrid-15

AVDI-Diagnostics-All-Keys-Lost-Programming-by-OBD-for-Toyota-Yaris-Hybrid-16

Key registration. Remove key from ignition.

At this step, ZN068 is used to switch IGN on together with a key blade.

AVDI-Diagnostics-All-Keys-Lost-Programming-by-OBD-for-Toyota-Yaris-Hybrid-17

ZN068 is taken out now and a blank key is inserted.

AVDI-Diagnostics-All-Keys-Lost-Programming-by-OBD-for-Toyota-Yaris-Hybrid-18

The new key is now being learned.

AVDI-Diagnostics-All-Keys-Lost-Programming-by-OBD-for-Toyota-Yaris-Hybrid-19

Key successfully registered.


:: بازدید از این مطلب : 216
|
امتیاز مطلب : 0
|
تعداد امتیازدهندگان : 0
|
مجموع امتیاز : 0
تاریخ انتشار : جمعه 1 اسفند 1399 | نظرات ()
نوشته شده توسط : lily

Hey guys, we are gonna use Autel MaxiIM IM608 to add a new key for 2014 BMW F012 with 868MHz Frequency via OBD.

Autel-IM608-add-new-key-on-2014-BMW-F012-via-OBD-1 (2)

Let’s go!

So, enter “IMMO”.

Accept the disclaimer.

Tap “BMW”.

Autel-IM608-add-new-key-on-2014-BMW-F012-via-OBD-2 (2)

Smart selection.

Autel-IM608-add-new-key-on-2014-BMW-F012-via-OBD-3 (2)

It will scan the CAS4/CAS4+ immobilizer system, DME engine system, EGS transmission system. Tap “OK”.

Autel-IM608-add-new-key-on-2014-BMW-F012-via-OBD-4 (2)

Go to “Key learning”.

Autel-IM608-add-new-key-on-2014-BMW-F012-via-OBD-5 (2)

It will read vehicle information and ECU information.

Autel-IM608-add-new-key-on-2014-BMW-F012-via-OBD-6 (2)

Enter “OBD learning”.

Autel-IM608-add-new-key-on-2014-BMW-F012-via-OBD-7 (2)

Nice, it comes with instructions which guide me how to do in step-by-step procedure.

Autel-IM608-add-new-key-on-2014-BMW-F012-via-OBD-8 (2)

Go to “OBD Read SK” to read the password.

We like to take the risk, so tap “Ok”.

Autel-IM608-add-new-key-on-2014-BMW-F012-via-OBD-9 (2)
Autel-IM608-add-new-key-on-2014-BMW-F012-via-OBD-10 (2)

Tap “Yes” to confirm we have a working key, and then put the working key to start coil as close as possible.

Autel-IM608-add-new-key-on-2014-BMW-F012-via-OBD-11 (2)

Alright, read password quickly.

Autel-IM608-add-new-key-on-2014-BMW-F012-via-OBD-12 (2)

Pick Key6 (Free key), then tap “Write key”.

Autel-IM608-add-new-key-on-2014-BMW-F012-via-OBD-13 (2)

Follow the instruction “Please put New key close to start coil, key frequency 868MHz”.

Operate “Key Learning” in two stpes.

The second step of writing data into key is in process.

Autel-IM608-add-new-key-on-2014-BMW-F012-via-OBD-14 (2)

Write key successfully!

Follow the instruction “Put the key close to start induction coil, press and hold the ignition for 10s. After the learning is completed, the key can be normally used.”.

Autel-IM608-add-new-key-on-2014-BMW-F012-via-OBD-15 (2)

Take the original key away from the vehicle when testing the new key.

Okay, the new can start the car perfectly.


:: بازدید از این مطلب : 223
|
امتیاز مطلب : 0
|
تعداد امتیازدهندگان : 0
|
مجموع امتیاز : 0
تاریخ انتشار : جمعه 1 اسفند 1399 | نظرات ()
نوشته شده توسط : lily

This article share the free download Volvo Premium Tech Tool diagnostic software,and you can click to download.

Free-download-Volvo-Premium-Tech-Tool-diagnostic-software-1

What is Volvo PTT?

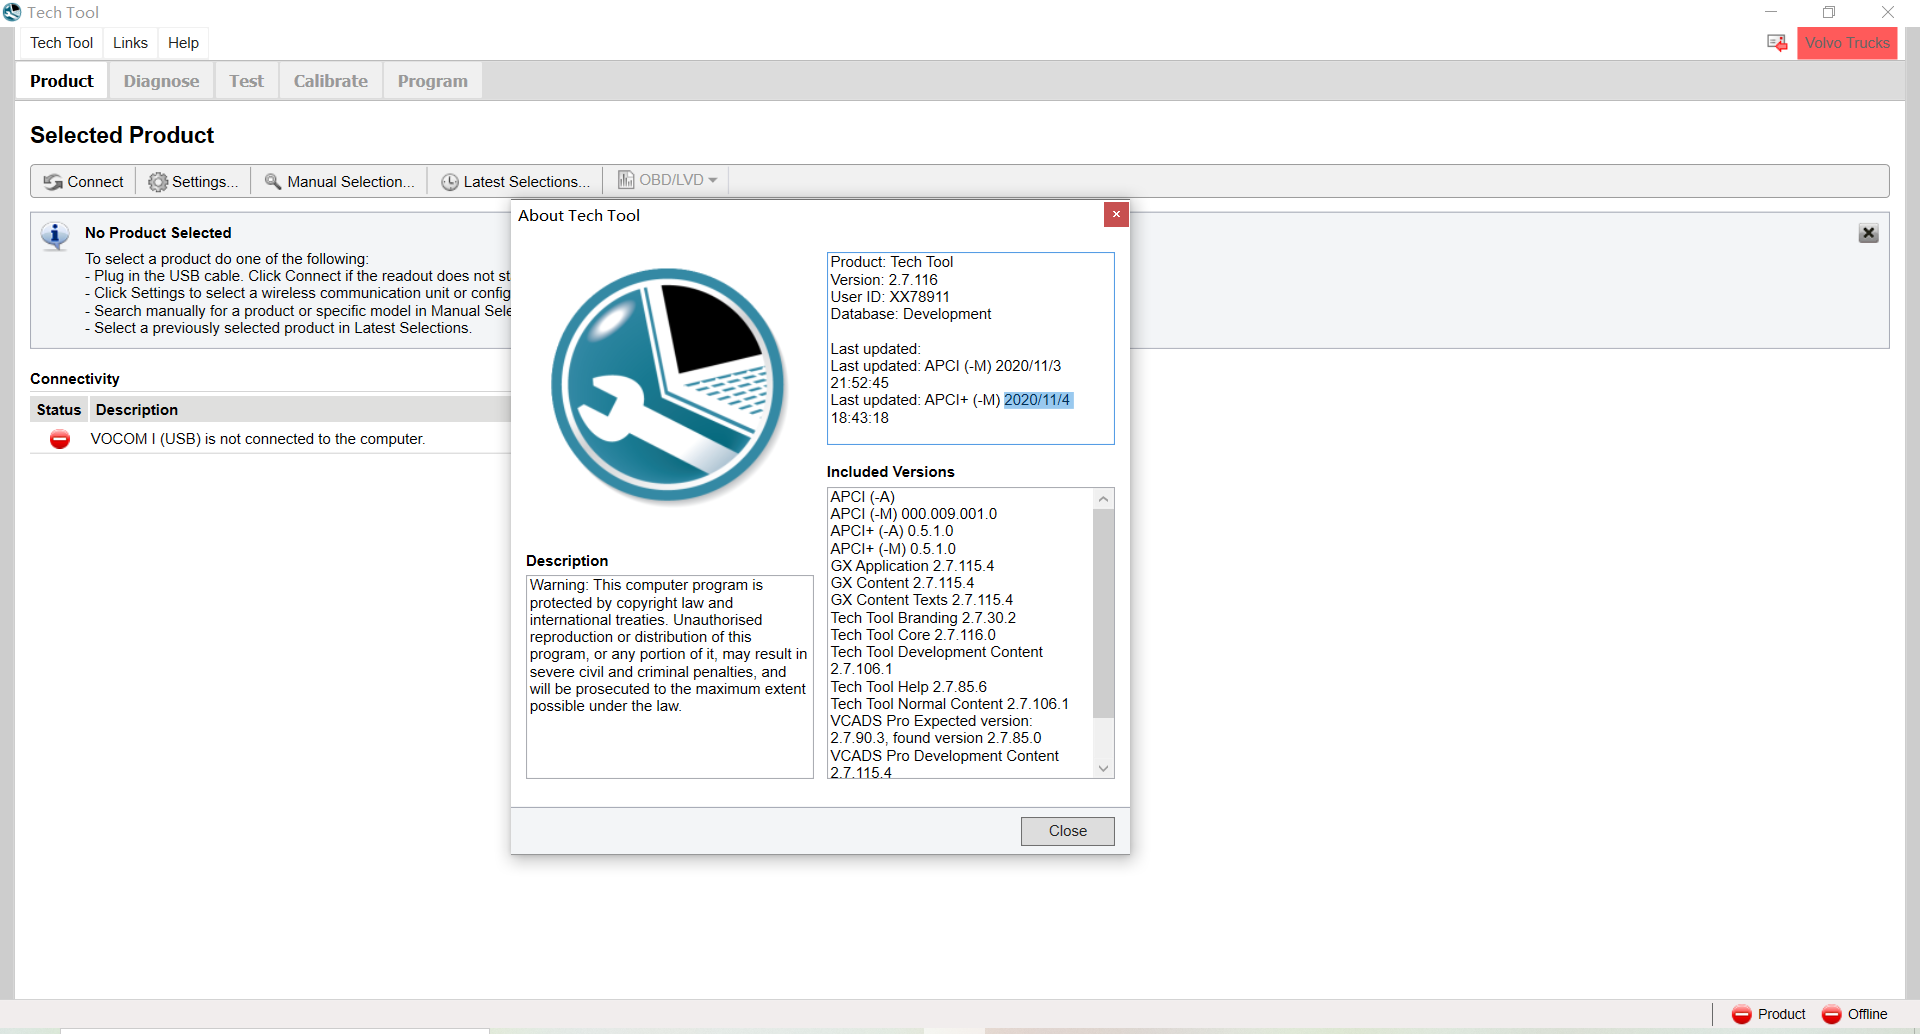
Volvo Premium Tech Tool (PTT) is a Windows-based diagnostic application specially designed to test, calibrate and program engine parameters.

Volvo PTT Software Vehicle Model Coverage:

Volvo Trucks (Older electrical system, Vehicle electrical system ’98);
Volvo Trucks (VERSION2, VERSION3 – PARAMETER PROGRAMMING);
Volvo Trucks (VERSION4 – FH4/FM4 – PARAMETER PROGRAMMING);
Volvo Buses (Conventional, Multiplexed, Multiplexed v2, Multiplexed v3);
Volvo Construction Equipment;
Volvo Penta (VERSION2, VERSION3);
Volvo OEM Component Customer (VERSION2, VERSION3);
Mack Trucks (V-MAC I/II/III, ITC, IV, IV+ – PARAMETER PROGRAMMING);
Renault Trucks (VERSION2, VERSION3, VERSION4 – PARAMETER PROGRAMMING);
UD Trucks (VERSION2, VERSION3).PARAMETER PROGRAMMING);

Note:The free download software haven’t been verified on above vehicle models,the pay version does.

Volvo PTT Install environment requirement:

Computer/Processor:Intel® Core i5 or AMD FX 8 Core Series

Memory(RAM):6GB,more memory improves performance

Hard Disk:120GB SSD(Solid State Drive) of free hard disk space

Optical Drive:DVD x8 drive

Display:XGA(1024×768 pixels) or higher resolution monitor with 32 bit color settings

Input device:Keyboard and mouse or compatible pointing device

Internet connection:Network using 10 Mbps or higher speed network adapter and/or WLAN

Miscellaneous:USB interface required.A battery-pack that may provide 500mA via USB.

Minimum Hardware Requirements:

Computer/Processor:Inter® Core 2 Duo(1.6 GHz) or equivalent AMD Athlon 64 X2

Memory(RAM):3GB,more memory improves performance

Hard disk:20GB of free hard disk space

Optical Drive:Internal/external DVD x8 drive

Display:XGA(1024×768 pixels) or higher resolution monitor with 16 bit color settings

Input device:Keyboard and mouse or compatible pointing device

Internet connection:Network using 10 Mbps or higher speed network apapter and/or WLAN and/or 33.6 Kbps or higher speed modem(not supported for Win7/8 clients)

Miscellaneous:USB interface required.A battery-pack that may provide 500 mA via USB.

Volvo PTT Diagnostic Software Hardware:

Volvo Diagnostic Kit (88890300)
Renault Diagnostic Kit (88840133)
MACK Diagnostic Kit (RP1210)
UD Diagnostic Kit (RP1210)

PTT 2.7 Free Download:

https://mega.nz/#!cF8zyaKT!h10dbN01lwuonbXTt9EF5gsKP7rAwga2k3T41BmMOtM

TechToolLicenseEditor .rar:

https://mega.nz/#!IQ9FhISL!jvuPkrB1oW3YQAFdEqD1vE65lAv-sdZbC0PdKVl63ZA

Link 1: PTT 2.6.0.29.iso

https://mega.nz/#!mZZjnaSb!vFH83IALo2DjTp9ykgXekWv3DO9_KCn3r3-wQIiGA9Y

Password: NOT required

Activation: NOT activated

Security: Unknown

Files: encrypted files in installation dir:

apci.dll.enc

Volvo.ApciPlus.dll.enc

VolvoIt.ApciPlusData.dll.enc

VolvoIt.ApciPlusTea2Data.dll.enc

VolvoIt.Waf.Authorization.dll.enc

VolvoIt.Baf.BrokerServices.dll.enc

ProductService.dll.enc

VolvoIt.TechTool.DataAccess.dll.enc

VolvoIt.Waf.ServiceContract.dll.enc

VolvoIt.Baf.ServiceHostProcess.exe.enc

VolvoIt.Waf.EswManagement.dll.enc

Volvo Preminu Tech Tool 2.05.20

https://mega.nz/#!WZ4GRRYR!EBvasNyBwXJEo6CkMSWCmHTkxVV92FNk70vlxBllzzE

Totally 1.97GB

Volvo PTT 2.04.87 All-in-one include XX40645 in dev mode and M140521 in normal mode (full unlock)

https://mega.nz/#F!bcM03BAJ!4omQ_Yr9UQH7B5BhhNwGNA
Open all-in-one in administrator

Use all-in-one, you do not have to replace the files as the install guide. It will do it automatically

Open log Manager→ stop service→ clear log→ se all-in-one→ start service (You do this every time you change user!)

Download Volvo PTT 2.04.87 APCI+ 11/2016

https://mega.nz/#!khUDBIqT!dJT5ZVkkhE2mZaCEZLXoWKrgTR_nycfHvDuUB7y9qqw

Download Volvo PTT 2.04.87 Setup

https://mega.nz/#!c5Ez0byA!8F2SD-ja7DtI2l1mONpieuvqoNbA6L3Nx1fVrELxFMM

Pass: virginia2015

Volvo PTT 2.07 New Features:

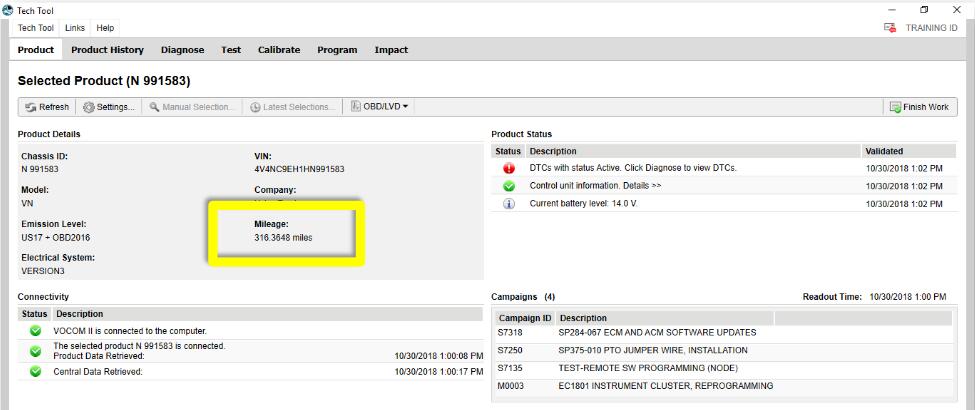
Added!Odometer Reading

Free-download-Volvo-Premium-Tech-Tool-diagnostic-software-2

Added!Work Order Number–Battery Status

Free-download-Volvo-Premium-Tech-Tool-diagnostic-software-3

New Design!Settings –Radio button style

Free-download-Volvo-Premium-Tech-Tool-diagnostic-software-4

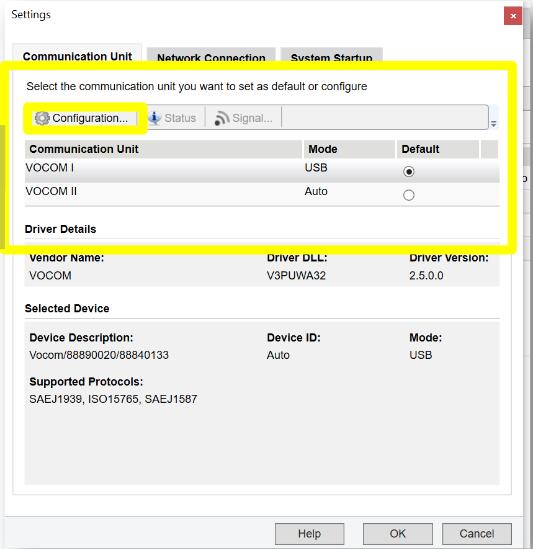
Configuration button launches the VOCOM II Configurator when VOCOM II is set as Default.

Free-download-Volvo-Premium-Tech-Tool-diagnostic-software-5

Added!Session Timeout

Heavy Duty Scanner Tech Tool will now automatically log out a user if there has been no user interaction for 1 hour. This timer is paused if there are any active operations running. A warning will appear before automatic logout.

Help Menu –Central Systems Status

Free-download-Volvo-Premium-Tech-Tool-diagnostic-software-6

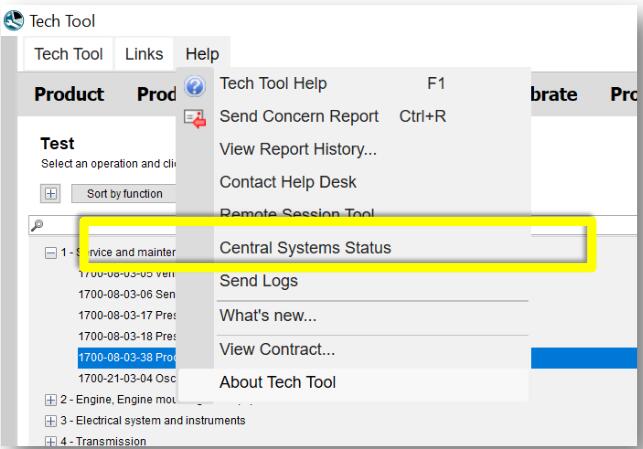
Note: This is not new with Tech Tool 2.7.

Links Menu –PremiumTechTool.com
Free-download-Volvo-Premium-Tech-Tool-diagnostic-software-7


:: بازدید از این مطلب : 221
|
امتیاز مطلب : 0
|
تعداد امتیازدهندگان : 0
|
مجموع امتیاز : 0
تاریخ انتشار : چهار شنبه 22 بهمن 1399 | نظرات ()
نوشته شده توسط : lily

The GM MDI 2 multiple interface will transfer data faster than a MDI 1/ VCX Nano GM (since its a MDI1 clone).  The GM MDI2 clone blue box are out, running about $218, it is really needed for the 2020 and future cars that will be running the future global B platform.

Hence installing the needed software to get everything to run can be almost brain damage if you are not tech savvy, and because of this, There is the MDI 2 clone with cracked free type software already loaded on a Sata Hard drive for $268.

MDI2 with 2020.09 HDD v8.3.103.39 gds2 tech2win
It will work on win10, but the cracked software for MDI2 clone requires win7.

Tips:
1. If you purchased V2020.09 GM MDI GDS2 Tech2win software Sata HDD, please directly plug it into your computer with Win7 OS, then confirm if the driver can be used, that’s ok, it is not necessary to install by yourself.

If it prompt update the JAVA, please don’t update it otherwise the GDS won’t be working.

If it prompt update the firmware, just do it.

2. After updating GM MDI manager, please update the firmware simultaneously.

Check: Update GM MDI/MDI2 Firmware

3. The WIFI GM MDI 2 Multiple Diagnostic Interface from OBD2TOOL is compatible with the original Bosch GDS2 software, as long as the user has License by yourself.

GM-MDI-2-Clone-is-Compatible-with-Original-GDS2-Software-1
GM-MDI-2-Clone-is-Compatible-with-Original-GDS2-Software-2

Customer feedback on MDI2 clone and genuine GDS:

“I just received my MDI II clone a couple of days ago and did a firmware update to make sure the latest v2020.12 Bosch software would recognize it and update it and it did with no problem. Programmed an ECM on bench. Connecting it through ACDelco Tis2Web and then use SPS to program the actual controller.

It is verified working with bosch GDS just as the seller advertised.”

If someone is looking to buy a Global B platform car, and needs a tool that will work on both it and the older cars like the C6 corvette, GM MDI2 clone really is the ticket. As for right now for a C6 and “A” platform cars, the vxdiag vcx nano gm has you covered for $118 instead.


:: برچسب‌ها: GM MDI 2 ,
:: بازدید از این مطلب : 215
|
امتیاز مطلب : 0
|
تعداد امتیازدهندگان : 0
|
مجموع امتیاز : 0
تاریخ انتشار : چهار شنبه 22 بهمن 1399 | نظرات ()
نوشته شده توسط : lily

Here we will show you how to active hidden function by X431 PRO for Toyota Reiz 2015.

Active-Hidden-Function-via-X431-PRO-for-Toyota-Reiz-2015-1 (2)

Function has been already tested on Toyota below:

1. Automatic padlock
2. Switch off the ignition about 30S/60S/120S Automatic padlock setting;
3 Press Remote control one time or twice to unlock setting.;
4. Luggage cover Settings;
5. The remote control shuts down all electric Windows;
6. The remote control opens all electric Windows;
7. ……

If you want to know more about X431 PRO, please click here: How to use launch X431.

Procedure:

Select“Toyota V48.42”above or VIN identification;
Select 16Pin diagnostic socket(European and other area)

Active-Hidden-Function-via-X431-PRO-for-Toyota-Reiz-2015-2 (2)

Select the automatic search

Active-Hidden-Function-via-X431-PRO-for-Toyota-Reiz-2015-3 (2)

Select after 2013.09

Active-Hidden-Function-via-X431-PRO-for-Toyota-Reiz-2015-4 (2)

Actual measurement car model is no smart key,select no smart key

Active-Hidden-Function-via-X431-PRO-for-Toyota-Reiz-2015-5 (2)

Read vehicle information

Active-Hidden-Function-via-X431-PRO-for-Toyota-Reiz-2015-6 (2)

Select system selection

Active-Hidden-Function-via-X431-PRO-for-Toyota-Reiz-2015-7 (2)

Select car body system

Active-Hidden-Function-via-X431-PRO-for-Toyota-Reiz-2015-8 (2)

Select BCM(Car Body Control System, main car body

Active-Hidden-Function-via-X431-PRO-for-Toyota-Reiz-2015-9 (2)

Select special function

Active-Hidden-Function-via-X431-PRO-for-Toyota-Reiz-2015-10 (2)

If select“Automatic Scan Special function”, This feature will automatically scan all options for personalized Settings for the diagnostic vehicle
If you select “all special functions”, this feature will display a warning message,The cue shows all the customization options for Toyota cars
Item, not all options are suitable for diagnostic models.

Active-Hidden-Function-via-X431-PRO-for-Toyota-Reiz-2015-11 (2)

Select customization

Active-Hidden-Function-via-X431-PRO-for-Toyota-Reiz-2015-12 (2)

Hidden functions display below:

Active-Hidden-Function-via-X431-PRO-for-Toyota-Reiz-2015-13 (2)
Active-Hidden-Function-via-X431-PRO-for-Toyota-Reiz-2015-14 (2)

Active-Hidden-Function-via-X431-PRO-for-Toyota-Reiz-2015-15 (2)

Active-Hidden-Function-via-X431-PRO-for-Toyota-Reiz-2015-16 (2)

If you want to know more cases about Toyota, please refer to Toyota repair.


:: برچسب‌ها: X431 PRO ,
:: بازدید از این مطلب : 194
|
امتیاز مطلب : 0
|
تعداد امتیازدهندگان : 0
|
مجموع امتیاز : 0
تاریخ انتشار : سه شنبه 7 بهمن 1399 | نظرات ()
نوشته شده توسط : lily

Here we will show you how to active hidden function by X431 PRO for Toyota Reiz 2015.

Active-Hidden-Function-via-X431-PRO-for-Toyota-Reiz-2015-1 (2)

Function has been already tested on Toyota below:

1. Automatic padlock
2. Switch off the ignition about 30S/60S/120S Automatic padlock setting;
3 Press Remote control one time or twice to unlock setting.;
4. Luggage cover Settings;
5. The remote control shuts down all electric Windows;
6. The remote control opens all electric Windows;
7. ……

If you want to know more about X431 PRO, please click here: How to use launch X431.

Procedure:

Select“Toyota V48.42”above or VIN identification;
Select 16Pin diagnostic socket(European and other area)

Active-Hidden-Function-via-X431-PRO-for-Toyota-Reiz-2015-2 (2)

Select the automatic search

Active-Hidden-Function-via-X431-PRO-for-Toyota-Reiz-2015-3 (2)

Select after 2013.09

Active-Hidden-Function-via-X431-PRO-for-Toyota-Reiz-2015-4 (2)

Actual measurement car model is no smart key,select no smart key

Active-Hidden-Function-via-X431-PRO-for-Toyota-Reiz-2015-5 (2)

Read vehicle information

Active-Hidden-Function-via-X431-PRO-for-Toyota-Reiz-2015-6 (2)

Select system selection

Active-Hidden-Function-via-X431-PRO-for-Toyota-Reiz-2015-7 (2)

Select car body system

Active-Hidden-Function-via-X431-PRO-for-Toyota-Reiz-2015-8 (2)

Select BCM(Car Body Control System, main car body

Active-Hidden-Function-via-X431-PRO-for-Toyota-Reiz-2015-9 (2)

Select special function

Active-Hidden-Function-via-X431-PRO-for-Toyota-Reiz-2015-10 (2)

If select“Automatic Scan Special function”, This feature will automatically scan all options for personalized Settings for the diagnostic vehicle
If you select “all special functions”, this feature will display a warning message,The cue shows all the customization options for Toyota cars
Item, not all options are suitable for diagnostic models.

Active-Hidden-Function-via-X431-PRO-for-Toyota-Reiz-2015-11 (2)

Select customization

Active-Hidden-Function-via-X431-PRO-for-Toyota-Reiz-2015-12 (2)

Hidden functions display below:

Active-Hidden-Function-via-X431-PRO-for-Toyota-Reiz-2015-13 (2)
Active-Hidden-Function-via-X431-PRO-for-Toyota-Reiz-2015-14 (2)

Active-Hidden-Function-via-X431-PRO-for-Toyota-Reiz-2015-15 (2)

Active-Hidden-Function-via-X431-PRO-for-Toyota-Reiz-2015-16 (2)

If you want to know more cases about Toyota, please refer to Toyota repair.


:: برچسب‌ها: X431 PRO ,
:: بازدید از این مطلب : 185
|
امتیاز مطلب : 0
|
تعداد امتیازدهندگان : 0
|
مجموع امتیاز : 0
تاریخ انتشار : سه شنبه 7 بهمن 1399 | نظرات ()