Panasonic Configuration Script Used to configure a Panasonic Unit to the recommended JLR machine settings. This sets the Firewall, Antivirus, Desktop image, Internet Explorer Level and disables Windows Automatic updates to make sure SDD functions correctly.
Full SDD Software Installation file Required when the SDD Machine does not have the previous SDD software installed.
SDD 158.00_FULL.exe
Jaguar Vehicle Data File (VDF)
Please note that Jaguar Land Rover are making changes to how we deliver Vehicle Data Files (VDF) to Jaguar Land Rover Approved Diagnostic Equipment. VDF do not need to be manually downloaded from the Diagnostic Delivery Server. VDF will now be automatically requested and downloaded as they are required.
Land Rover Vehicle Data File (VDF)
Please note that Jaguar Land Rover are making changes to how we deliver Vehicle Data Files (VDF) to Jaguar Land Rover Approved Diagnostic Equipment. VDF do not need to be manually downloaded from the Diagnostic Delivery Server. VDF will now be automatically requested and downloaded as they are required.
Single Point Authoring (SPA)
Please note that Jaguar Land Rover are making changes to how we deliver Single Point Authoring (SPA) to Jaguar Land Rover Approved Diagnostic Equipment. SPA files do not need to be manually downloaded from the Diagnostic Delivery Server. SPA files will now be automatically requested and downloaded as they are required.
Update installation file Update installation file Update installation file Required to update an SDD machine from the previous SDD software to the latest SDD Software.
Contains SDD application enhancements and vehicle software updates and is to be installed after the FULL SDD Software.
SDD 158.03.exe
The Panasonic Configuration Script is for Approved Panasonic units only using the following operating system:
Windows 7 32-Bit operating system
Windows 10 Pro operating system
Installation of the Panasonic Configuration Script should only be completed when the Panasonic unit has been rebuilt or does not have the SDD logo as the Desktop background image.
SDD 158 Windows 7 install:
1.Download ‘JLR Psonic Script-Setup WIN 7 – V18 .zip’ from
4.A pop up will be displayed ‘Extract Compressed (Zipped) Folders, Select a Destination to extract the files to and Select ‘Extract’
5.Locate and double click Folder ‘V2.9.1.0’
6.Double click ‘PanasonicScript-Setup’ (DO NOT select ‘PanasonicScriptSetup.exe.manifest’)
7.Several ‘MS Dos’ pop ups will be seen during this application
8.A pop up will be displayed – ‘Unit Reboot – Configuration is complete a reboot is required to finalise settings’ – Click ‘OK’ to reboot the unit
9.Following the ‘Reboot’ there could be more ‘MS Dos’ pop ups, once these have completed,the script has been run successfully.
T4 Software install :
(Land Rover 1995 > 2006 only)
1.Insert RDS 7 Disk.
2.Open RDS 7
3.Double click ’RunProgs.bat’.
4.Accept the installation of ‘Microsoft.NET Framework 1.1 package’.
5.Select ‘I agree’ to the ‘Microsoft.NET Framework 1.1 license agreement’.
6.Select ‘Install’.
7.‘T4 Installer version’ will open.
8.Select ‘Set CD Drive letter Z’.
9.Select ‘Disk Management’.
10.Right Click and select ‘Change Drive Letter and Paths…’.
11.Select ‘Change’.
12.Select from the drop down box ‘Z’.
13.Go to ‘T4 Installer version’ and select ‘OK’.
14.RDS 7 will now install.
15.The Machine will restart automatically.
16.Eject the RDS 7 Disk.
17.Install the ‘Panasonic Script’.
The use of third party Firewalls and Anti-Virus software will cause the installation and functionality of SDD to be affected and may result in SDD not installing correctly. Refer to Administration Bulletin; JAB00034 & LAB00038 for further information. For US/Canada refer to: SDD Maintenance & Troubleshooting Guide on TOPIx under: Documents > Diagnostics > IDS / SDD.
1.Download the Full Installation file eg. ‘SDD_158.00_FULL.exe’.
2.Download all available Software Updates and install the update in numerical order.
3.Restart the SDD Machine.
How to update from SDD 157.06 to SDD 158.00?
1.Download and install the current Update Installation file eg. ‘SDD 158_157 UPDATE.exe’.
2.Download all available Software Updates and install the updates in numerical order.
3.Restart the SDD Machine.
:: برچسبها:
SVCI DoIP ,
:: بازدید از این مطلب : 246
DTS monaco software is development by Mercedes Benz manufacturers ,all car data one click scan and save. Data can be directly change the underlying data, the module used directly copied data replacement. Automatic programming, can automatically set code completely out of online operation.
1.DTS-monaco is the official software used by Daimler Benz development engineers
2.DTS Monaco is universal engineering test terminal for the diagnosis and control function of the vehicle controller, The name Monaco is derived from the modular analyzer used in vehicle traffic
3.DTS Monaco covers all the tasks in the field of engineering, testing and production test preparation
4.When Mercedes-Benz maintenance test it is the greatest authority,the perfect support for C4(SDconnect) and (Ecom) Hardware(at present, Das-xentry.Vediamo lower authority)
1.Quick Test;Entire vehicle ECU quick test, and the test can choose to edit more
2.Variant Coding; Coding with variation add VO- delete VO function
3.ID identification ; One click to read the whole car and save all modules programmed numbers
4.Complete Variant Coding; One time to read all the ECU coding vehicle data, can be written to the vehicle again, completely off-line operation
5.Diagnostic Services; Advanced features can see your choice of internal and external data module, turn on the computer authorization(not driving license), Activate ECU, reset ECU, modifying the original chassis number
When installing DTS Monaco to communicates and works with SD connect c4 all user installed SDconnect Toolkit version 2.1.3. And no one tried to force the work SDconnect Toolkit version 2.1.4.2, which is installed together with the installation of Setup_Addon_DAG. And I did it.
Checked only on the system without DAS/Xentry.
DTS Monaco 8.03.12.
Windows 7 x64.
Follow the next steps:
1.Install Monaco
2.Install Setup_Addon_DAG
3.Go to С:\ProgramData\I+ME ACTIA\Toolkit\
4.Open and edit toolkit.ini
Code:
ShowInTray=2
NetworkIcon=2
DeviceIcon=1
ConnectionState=1
1.Save file and reboot Windows
2.Connect SDconnect MUX via cable
3.Start System Configurator
4.Go to Licenses and you will see your MUX as DCDIPartW with your serial number. After editing in Interfaces type of MUX will change to MVCI_IME_ACTIA_GmbH_SDconnect
9.Go toInterfaces
Code:
eCOM_SMR
Interface name – > SDconnect_SMR
Bus system interface – > D-PDU API
D-PDU API version – > I+ME ACTIA GmbHXS_D_PDU_API_FOR_DTS_8_03_12
■Development of diagnostic and control functions for ECUs
■Function test and validation
■Integration and system test
■Preparation of test sequences for Manufacturing and Service
■Analysis of returns and Quality Assurance
Flexibly Adaptable to the Relevant Task
DTS Monaco is part of the Diagnostic Tool Set product family and is based on the DTS Base System. Monaco stands for Modular Analyzer for Vehicle Communication. A clearly laid out start page enables simple and fast access to the functions required most frequently. The actual workspace is divided into two: one area with a fixed layout and one with layouts that you can toggle between. A status display below shows communication server messages. The various functions are realized using special, configurable interface elements. These “HMI Controls” can be arranged freely in the layouts in configuration mode and comprehensively configured.
Early Detection of Problems and Errors
In execution mode, a configured workspace can be “started”. In doing so individual functions can be started automatically and communication can be established in advance if so required. Self-generated test sequences enable both simple and very complex function tests. This makes it possible to detect, and remedy, communication problems and function errors at an early stage. Communication data and test results can be documented in entirety in the process.
Fast Results
For typical use scenarios predefined templates including an universal database for the OBD self-diagnosis as well as various protocol templates (WWH-OBD, J1939-73 among others) are supplied. In Demonstration mode, all functions can be tested, even without an interface and a license, using a detailed example including simulation. Furthermore, the tool has a completely integrated OTX runtime for running complex test sequences in accordance with ISO 13209. An authoring tool for creating such OTX sequences can be started directly from DTS Monaco.
What’s the difference between DTS-monaco and Vediamo?
DTS and Vediamo difference
Function
DTS
Vediamo
entire vehicle setting code one-click save
yes
no
entire vehicle control unit software number one-click save
yes
no
read entire vehicle fault code
yes
no
data exchange
yes
no
quick test
yes
no
single control unit one-click setting code offline
yes
no
Offline programming
yes
yes
Increase or decrease SA code
yes
yes
Personalized settings control unit parameters
yes
yes
Feedback of DTS Monaco:
I successfully connected to ZGW221 w/o car
DTS Monaco always sends a notification that it is impossible to contact the EIS221 to read the mileage, voltage, etc. (because w/o car)
(more reviews will be updated here…)
:: برچسبها:
mb star ,
:: بازدید از این مطلب : 231
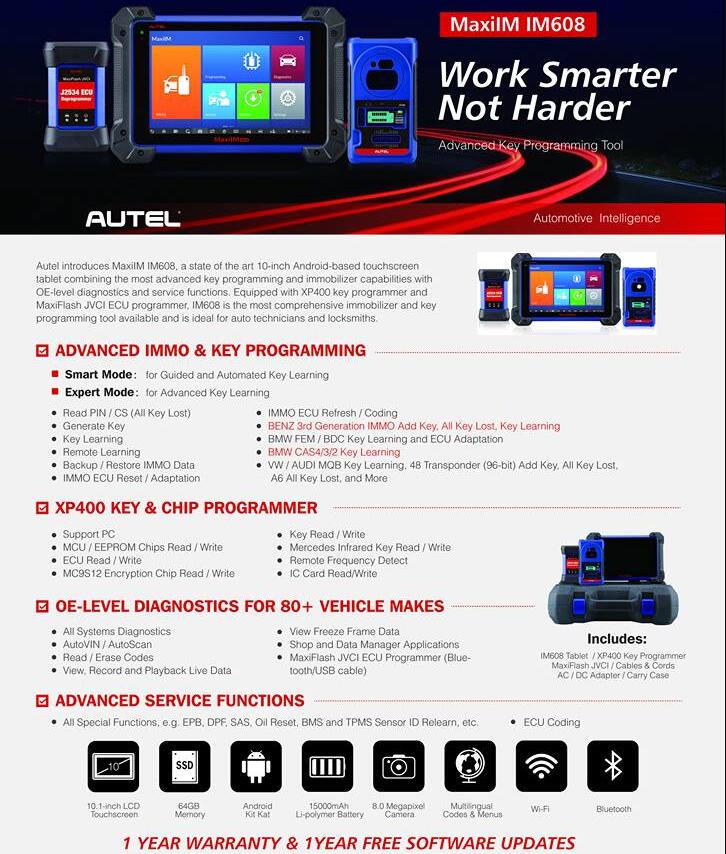
Autel MaxiIM IM608, replacement of Auro OtoSys IM600, features in IMMO functions for over 60 worldwide makes and models as well as service reset functions (EPB, DPF, SAS, Oil Reset, BMS and TPMS Sensor ID Re-Programming etc).
– All Special Functions, EPB, DPF, SAS, Oil Reset, BMS and TPMS Sensor ID Re-Programming etc.
Autel MaxiIM IM608 reviews on IMMO and key programming:
PS: Reviews speak louder than the claimed functions
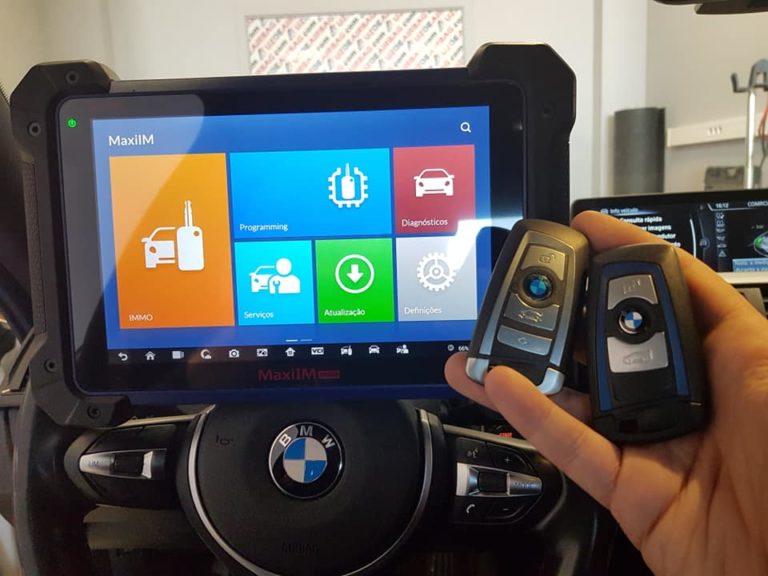
1. BMW FEM systemAdd Key complete
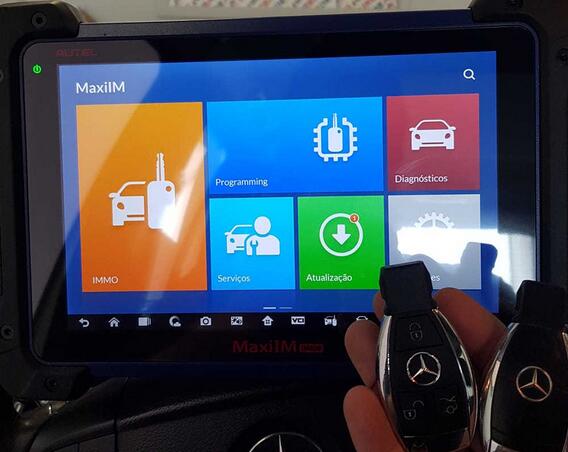
2. Add Key Mercedes ML320 CDI 2007
3. First job done with IM608 2014 Seat Ibiza, 2 keys added. 4. Question: bought a IM608 is at a W212 Mercedes E220 and 2010. He has gone to follow the lost key situation and it has said to use the wires and eeprom. But the pictures do not show which cable and how exactly to pin it out easily?
Answer: Engineers say W212 akl can be done by OBD.
Better show the supplier the test route and the screenshot. Besides, you can send the datalog for analysis.
5. Autel MaxiIM IM608 program key for Volvo XC60 successfully. 6. VAG key programming: pretty good and fast, an alternative to vvdi2, however vvdi2 is a proven product so I would stick with my xhorse tool.
Mercedes: Not at vvdi mb level, but not much is!
Asian brands: Good programming and diagnostic functions, certainly a strong point.
US brands: Good all round coverage, and looks like it will continue to develop.
Europe brands: Can do basic diagnostic (nothing special) and has poor key programming.
Eeprom functions : Still lots of development to do.
7. Just got this tool yesterday so can’t say much about it, but so far… Golf MK5 2005 AKL – add key OK – 2min Scirocco 2011 – add key OK – 2min40sec Honda Civic 2006 – add key OK – 55sec Golf V AKL 2007 without remove dashboard
All menus and programming guide you trough. I can just hope it does what is on the vehicle list
Well fellas… thats actually my vids. And yes. It was micronas dash. And its bit tricky…. if you choose AKL function than it wont work. I mean it will fail to program. But if you choose just Add Key it works as you can see.
No need internet to work on cars but each day when you power it up it need connection for the first time. Presumably checking for updates etc
Done Tiguan 2013, Scirocco and few others VAGs. Works fine on them.
8. I have this tool since may. it is getting better and better ,support is quick. error logs they always reply and send beta version to fix the issues. it is very good tool for bmw as well done few cas2 and 3 keys, I have downgrades 3 cas+ as wellwithout any issues.
To be continued……
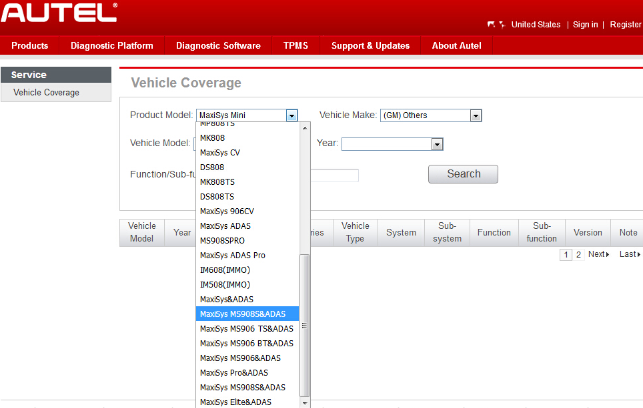
2. Autel MaxiSYS MS908S PRO
1) OBDII Wi-Fi Wireless Diagnosis for the following car models:
The Service section is specially designed to provide you quick access to the vehicle systems for various scheduled service and maintenance performances. The typical service operation screen is a series of menu driven executive commands. By following the on-screen instructions to select appropriate execution options, enter correct values or data, and perform necessary actions, the system will guide you through the complete performance for various service operations.
The most commonly performed service functions include:
l Oil Reset Service l TPMS Programming Service l EPB Service l ABS/SRS Services l SAS Calibration Service l DPF Regeneration Service
4.7.1 Function Descriptions
This section describes the main functions for vehicle service:
Oil Reset Service
This function allows you to perform reset for the Engine Oil Life system, which calculates an optimal oil life change interval depend on the vehicle driving conditions and climate. The Oil Life Reminder must be reset every time the oil is changed, so the system can calculate when the next oil change is required.
Tire Pressure Monitor System (TPMS) Service
This function allows you to quickly look up the tire sensor IDs from the vehicle’s ECU, as well as to perform TPMS programming and reset procedures after tire sensors are replaced.
Electric Parking Brake (EPB) Service
This function has a multitude of usages to maintain the electronic braking system safely and effectively. The applications include deactivating and activating the brake control system, assisting with brake fluid control, opening and closing brake pads, and setting brakes after disc or pad replacement, etc.
ABS/SRS Services
This function allows you to perform various bi-directional tests to check the operating conditions of both the Anti-lock Braking System and the Supplemental Restraint System, such as Automated Bleeding, Pump Motor Test, and checking Module information, etc.
Steering Angle Sensor (SAS) Service
This service function allow you to perform calibration for the Steering Angle Sensor, which permanently stores the current steering wheel position as the straight-ahead position in the steering angle sensor EEPROM. On successful completion of the calibration, the steering angle sensor fault memory is automatically cleared.
DPF Regeneration Service
The Diesel Particulate Filter service function performs the regeneration procedure which is the DPF cleaning operation to clear the blockage through continuous burning of the particulate matter captured in the DPF filter. If the DPF light on the vehicle comes on and you successfully complete a DPF regeneration cycle, you will notice that the DPF light will automatically turn off.
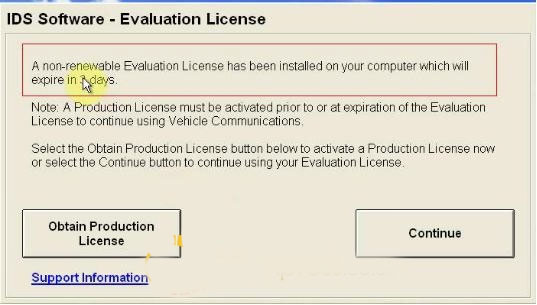
Ford IDS v86 cracks can be installed directly into Windows native for vehicles before 2012. However, in other versions of IDS (original), usually only 3 day trial version will be offered. So, how do you solve it? There are three options. here you go IDS Software – Evaluation License
A non-renewable evaluation license has been installed on your computer which will expire in 3 days
Note: a production license must be activated prior to or at expiration of the Evaluation License to continue using Vehicle Communications
Select the Obtain Production License button below to activate a Production License now or select the Continue button to continue using your Evaluation License
Way 1: use VMWARE player To install VMWARE which can freeze and restore ids when you use it (like a restore point but no registry entries for rollback)
Using a VMWARE image would have been MUCH easier. Simply make a copy of a windowsXP virtual machine BEFORE installing IDS. Then when you 3days is up.. delete that virtual machine and then use your backup one.. install IDS and continue on again!
Use v91 vmware (fix the day)->v100 (others)
In details…
with ids installed and expired start task manager and make sure no ids or bosch services are running. get iobit uninstaller and system care use iobit uninstaller to remove ids and bosch at end of basic uninstall select deep scan, then select shred files next start iobit system care and do a registry scan, or better still a full scan next manually delete the files bosch and ids in program files and in program date then empty bin and shred files reboot your machine and it will then allow a re install
NO active license… look here: When you open VM at first time, choose “I move it” and all will be OK.
Way 2: install Deep freeze Just don’t open IDS install deep freeze and no need to change cmos date every time
In details…
How to install V81 and freeze program correctly:
Step 1: How to install Ford VCM 2 IDS V91 – up to V96 Insert V91 Ford VCM II CD into your computer. Open the file and copy and paste “DFSTD” and “DFSTD KEY” to the desktop. Double Click on “ids-91.01_full”. Select language and Click on “Next”. Click on “Yes”. Click on “Next”. Select “I accept” and Click on “Next”. Click on Next to install the software on Disk C. Click on “Reboot”. Select “Non-Dealer” as Dealer Type and “MADAGASCAR” as Country and then Click on “Tick” icon. A window “IDS Software – Computer Date Synchronization” will pop up, Click on “Continue”. Then you will get a window saying your computer will expire in 3 days. If there is no expire message, it indicates your installation failed and cannot be reinstalled. Therefore, please strictly follow this video.
Step 2: How to install IDS V81 calibration files Take out V91 CD and insert V81 IDS CD. Open the file and double Click on “VCMDVD”. Click on “Calibration” to install calibration file. Click on “Next”. Click on “Next”. Click on “Install”. Click on “Finish” Click on “Exit”. Check if its device has established communication with the car by check “ETAS VCI USB RNDIS DEVICE” in device manager. Check if there is VCM network in “Network Connections”. If the VCM network is disconnected, open “Windows Firewall” and select “Off”. If the network is still disconnected, select “Start” – “All programs” – “Bosch” – “VCI software” – “VCI Manager”. Open “VCM Manager” and Click on “Repair USB”. Click on “OK”. The network is now connected. Double Click on “IDS”. Click on “Tick” icon. Then the upgrade will start automatically. Click on “Tick” icon at the bottom right when the upgrade is finished. Go to “User Preferences”, Click on “Computer” icon and check hardware and software version under “VCM II”. Select “Start new session” and Click on “All other” to establish communication to the car. Select “Module Programming”.
Step 3: How to install Freeze Software
Very important note: the Freeze software should be installed within 3 days after the V91 IDS is installed. Otherwise, the Freeze software will not be installed anymore.
Open “DFStd”. Click on “Next”. Select “I accept” and Click on “Next”. Find License Key in “DFStd_KEY”. Copy and paste the key into the blank and Click on “Next”. Unselect Disk D and Click on “Next”. After installing the frozen software, the V91 IDS software will not be deleted even if you reinstall the computer system. Therefore, if you want to install other version VCM2 IDS software later, please choose V86 rather than V91. Click on “Next”. Click on “Install”, your pc will then reboot automatically. The installation is finished.
Way 3: crack software by license files
How to crack Ford IDS software by License file?
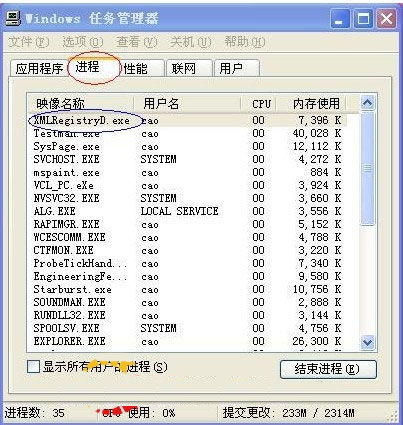
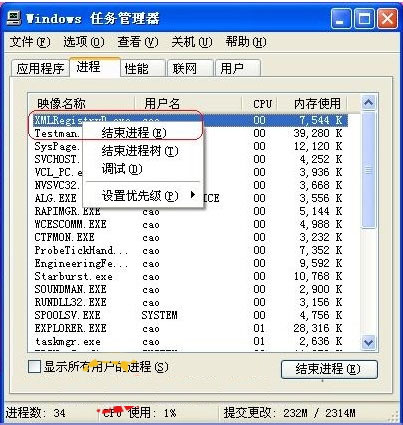
Please don’t run the IDS software, before you install the License “Ford-License for IDS.exe”. 2. If you can see the windows process “XMLRegistryD.exe” in the windows task manager, then kill the windows process “XMLRegistryD.exe” before you run the “Ford-License for IDS.exe” License. When you install the License “Ford-License for IDS.exe”, you may see” Can’t run patch while IDS program is running.”, what should you do? Here is the answer. While you install the License “Ford-License for IDS.exe”, if you see the picture 1, then you should do the step 1, step 2, step 3.
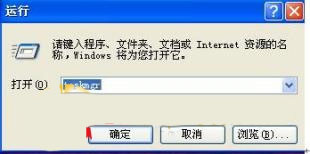
Step 1:Press the “windows key + R” of the keyboard, then display the picture 2:
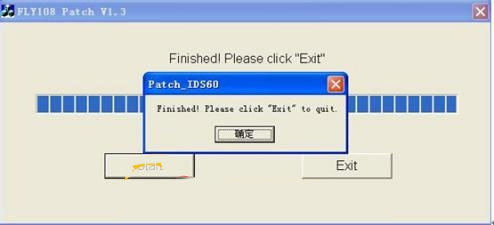
Step 2: Input the “TASKMGR” into the textbox of “open (o)”, then display the picture 3: Step 3: Kill the windows process “XMLRegistryD.exe”. Step 4:Rerun the License “Ford-License for IDS.exe” .then directly display the picture 5.
The last…. it’s IMPORTANT for you to read something about IDS software license…
VCM2 license:
easy way to crack download any version from any where you like.. and just before opening ids. install deep freeze…restart.. then every time you get 3 days lic… you start ids enter your detial like dealer id,country.. etc.. it gives you 3 days licence..
hurry no playing with cmos date… just don’t open IDS install deep freeze and no need to change cmos date every time
VXdiag licence:
is actually written on the hard drive and since the the VM is in non-persistent mode, it disappears as soon as you turn off the VM. Remove non persistent mode. Get your license and put back the non persistent mode. Make sure not to launch IDS while you do this
VCM2 or VXDIAG VCX NANO Ford:
In my opinion VXdiag tools are crappy and not worth buying it. Using vcm2 sp177-c1 I can communicate with all car and truck. But still have difficulty programming some pre 2010 truck / SUV.
:: برچسبها:
Ford vcm 2 ,
:: بازدید از این مطلب : 228
The mind of your car is very small and made to be easy to read, so you should not be surprised by the simple way to see exactly what it is. OBDII is the real version 2.0 for this information frequently. The actual data tracked by the OBDII system was originally designed to track the engine emissions and find problems causing cars to pollute more frequently. Today, manufacturers have expanded the standard to accommodate a lot of data on overall performance and problems.
Diagnostic Trouble Codes
The Obd2 diagnostic tool allows your vehicle to report three types of information: Diagnostic Diagnostic Code (DTC), Real Time Data, and Frame Information. DTC is just error code, which can appear to determine the problem of the car you are experiencing. For example, DTC P0302 indicates “cylinder 2 misfire detection”.
diagnostics troublde code
Real-time data can be raw sensor information recorded for the OBD2 computer. This data is a good idea to troubleshoot and monitor the performance of the engine.
The freeze frame data is actually a snapshot of the real time sensor feed at the right time of the DTC condition. An auto mechanic can use this data to determine what is happening at that moment your vehicle test tool “has continued.
The Standard Protocols
In the OBD II standard, there are many protocols for transferring data from a car to a diagnostic device.
ISO9141 – 10 Kbits/sec : most Asian plus European producers J1850 PWM (Pulse Width Modulation) – 100 Kbits/sec: Mazda, Ford J1850 VPW (Changeable Pulse Width) – 100 Kbits/sec: primarily GM CAN(Controller Area Network): more details newer vehicles
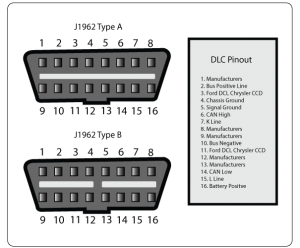
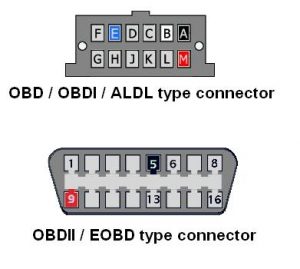
Diagnostic Connector
The physical connector of the OBDII port is called the Information Link Connector (DLC). This is a 16-pin plug that is normally located under the panel near the tire. On the Mazda, the connector is located close to the release hole in the hard-to-shoot position.
When looking for your DLC, remember that a triple sphere around the owner of the car is quite large, and the port may be toward the particular passenger. Fortunately, there exists a database of DLC areas.
Among the hooks on the OBDII connector is the power from the vehicle’s battery, which means that OBD II travelers do not need batteries or external power. Live Data
A standard group of DTCs can be purchased on most cars, but each manufacturer includes a huge selection of proprietary codes that will help determine the error on a particular car. Real-time information is transmitted through the OBD slot including speed, RPM, airflow temperature, and various sensor values (usually oxygen sensors plus percussion detectors). Do not assume that all cars transmit exactly the same information on the interface, meaning your data stream may be different. Hardware
OBDII hardware reduces to two groups: stand-alone devices that have special meaning for analysis (see examples), and signal converters that provide physical connectivity, but require software on Some types of computers or PDAs to display data. The conversion tools are definitely a little cheaper, because they only communicate with cars and have no processor or memory. They can also be more flexible, because the software can be modified or replaced. Software
Just like you already have some hardware options, you also have software options. There is no guarantee that all of the OBD programs that operate with each adapter can be reached; However, providers are very good at providing the right information, so it’s easy to make sure that you are getting the items that can interact. Since the Scan Tool may be the hardware we are discussing, we will also discuss their software primarily, but there are a few other interesting products to speak first. Scan Tool
Scan Tool software means a new compromise between openness, openness, and functionality. Versions are sold for DOS, Windows Home, plus Linux. GPL source code C can be downloaded. The Scan tool explores all of the data channels within a loop so shutting down channels you do not care about will ensure you get increased sampling rates for the channels that you’ll be interested in. You can see the data change immediately, graph data, it may be hard to note the pattern. Conclusion
It should be mentioned that some of the customer’s devices use car key programming data to provide useful data to the driver. Reader read scanner plus DTC delete, digital dashboard provision, and travel computer. Chip car is a data recorder telling parents and bosses in case their car is driving harder or farther than they should have been. So you can understand the mind of the car.
SCN or CVN coding was added to the cars back in 2003 if not earlier . The idea of OFFLINE coding was to be able to make SCN codings when you don’t have an internet connection at your workshop to be able to perform this online. In both cases an SCN or CVN coding was required.
Let’s not confuse OFFLINE coding with simple CODINGS !
Codings can be done with regular DAS or Developer DAS more deeply. Coding does not imply that you have to replace your unit software completely. If you have to make an Offline coding this implies to flash your unit with an updated software version or at least the same version which you have already (not sure if you will be able to downgrade your software) and then SCN code that one to be activated in your car. I’m not aware of any car which can be OFFLINE coded without the request for an SCN code.
The only good point here is the time needed to do this. Yes , you can make OFFLINE coding with your system and then go back to the dealer and ask them to make an SCN coding for you…however are u sure they will not charge you the same amount as if it was done in their workshops ?
The internal VIN of this car (e.g.w211): is WDB2110261AXXXXXX
The first letter of the external VIN after “WDB” gives the body style, like
– U for MB means 211
– F means Sedan
– next two digits are the model within the body type, seems to be a direct copy from the internal VIN
– next digit is about the SRS system, I’ve found explanations up to the letter F, so this car must have more SRS equipment than known when my reference was drafted
– position 9 is a check digit and the tenth digit comes from the model year.
It is much easier to find this if you enter the external VIN to EPC and let it decode the internal VIN for you. Then pick up digits 4-9.
Ps. 17-digit code & 6 digits of numbers
Office programming:
If you want to program ecu ‘offline’, there are several options:
In DAS, you can program ecu’s offline. (In xentry, you have to buy xentry calculator.)
Vediamo is the way to go to program ecu offline and is used by daimler factory
If you want only for 204.041 as above, you can try to use 204 in DAS. and there is free offline programming
between those three options, vediamo is the best and can be used for 99% vehicle’s model
Noe that: For those with Star diagnosis for 100usd around. DAS is your way to go.
DAS (older models before 2011, but still most cars communicate through this program)
Xentry (new model cars 2011-2016)
If you set it up correctly, you can program offline in DAS only. Then if we need to go online with DAS we switch the modified flash folder to the original.
Xentry there is no offline programming, only online. Obviously, you need to have login and pass to go online.
Btw, offline programing is an ancient way of the service,..nowadays its better to use online services,…its safety,..and quickly
The last, how to enable DAS for offline programming:
Option 1: (try on your own risk)
It’s very simple to enable “Offline” programming in newest DAS version
copy this file to
F:\Programme\DAS\trees\pkw\flashen\ini
(click yes, to replace existing).
If you don’t have this function for any concrete car – check first six VIN digits for this car, and add to this file in model section.
for sample – to enable option for WDD221054 – add text string to file :
221.054=YES
Option 2: (try on your own risk)
Open F:\Programme\DAS\trees\pkw\flashen\ini on the notepad and add ->
First of all
———-A451———-
451.331=YES
451.332=YES
etc
etc
etc
The options above are diy solutions from DAS users.
TRY ON YOUR OWN RISK.
NO ONE HOLDS RESPONSIBILITIES FOR YOU.
If solutions above remain useless or you want a solution WITH SECURITY, please try option 3, the idiot solution.
Electronic Service Tool (EST) Engineering Level* (software only) – used by New Holland dealer technicians to connect with vehicles that have a Controller Area Network (CAN) BUS.
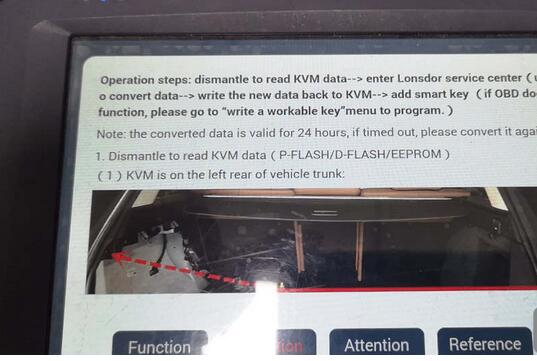
Topic: Guide on program 2015- land rover add smart key & all smart keys lost with Lonsdor K518S / Lonsdor K518ISE.
Part 1: Guide on program 2015- land rover add smart key with Lonsdor k518S
Dismantle to read KVM data
Enter Lonsdor service center (u.lonsdor.com) to convert data
Write the new data back to KVM
Add smart key (if OBD doesn’t support this function, please go to “write a workable key” menu to program.)
Note: the converted data is valid for 24 hours, if timed out, please convert it again.
1.Dismantle to read KVM data (P-FLASH/D-FLASH/EEPROM)
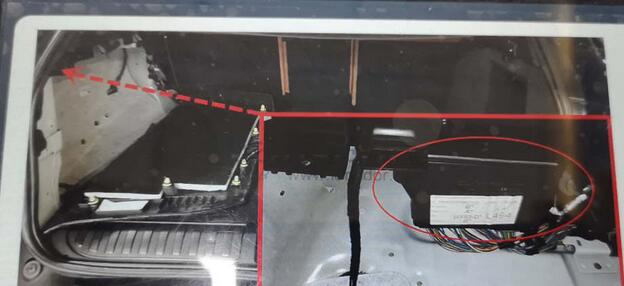
1). KVM is on the left rear of vehicle trunk.
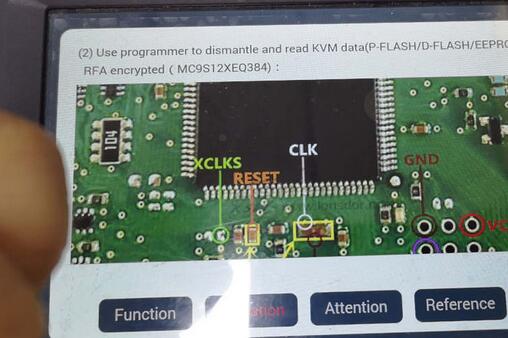
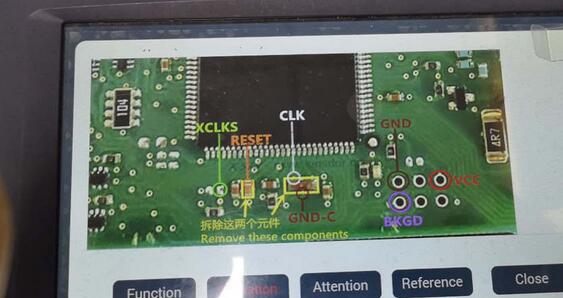
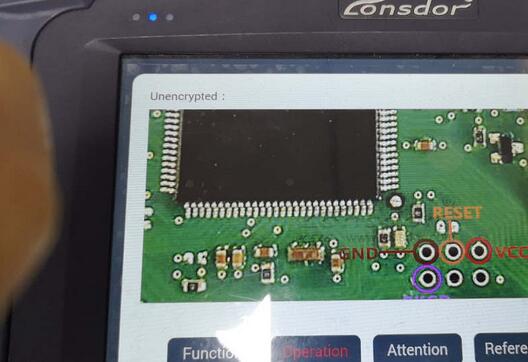
2) Use programmer to dismantle and read KVM data (P-FLASH/D-FLASH/EEPROM) RFA encrypted (MC9S12XEQ384):
Unencrypted.
2.After reading KVM data, login “Lonsdor service center (U.lonsdor.com)” to convert it. and write the converted data back to KVM and roll back installation. Then you can execute [add smart key] operation.
Add smart key
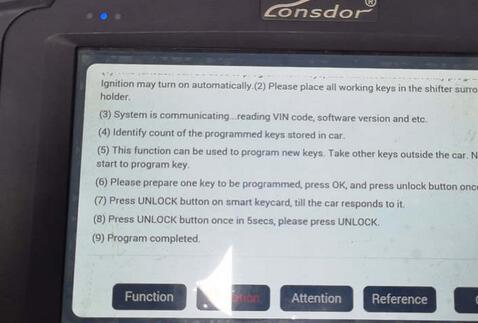
1). This function can be used to program new keys, and will not affect currently programmed keys. Ignition may turn on automatically.
2) Please place all working keys in the shifter surround or cup holder.
3) System is communicating… reading VIN code, software version and etc.
4) Identify count of the programmed keys stored in car.
5) This function can be used to program new keys. Take other keys outside the car. Next step will start to program key.
6) Please prepare one key to be programmed, press OK, and press unlock button once in 5 secs.
7) Press UNLOCK button on smart keycard, till the car responds to it.
8) Press UNLOCK button once in 5 secs, please press UNLOCK.
9) Program completed.
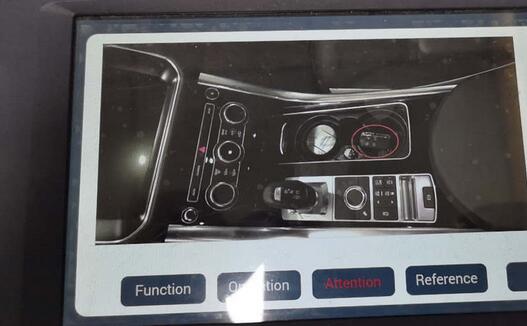
1.The working key will need to be placed in the shifter surround or cup holder (sensor area) in the beginning.
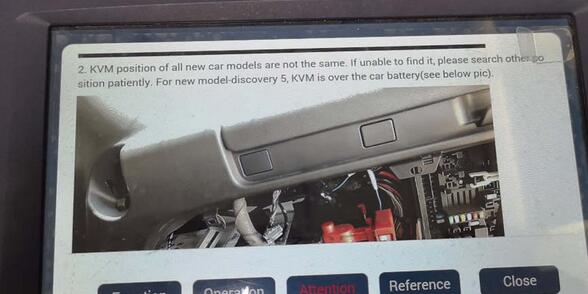
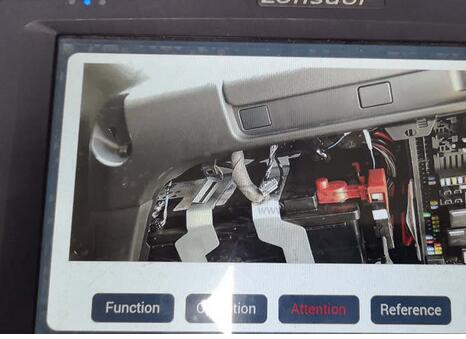
2.KVM position of all new car models are not the same. If unable to find it, please search other position patiently. For new model-discovery 5, KVM is over the car battery (see below pic).
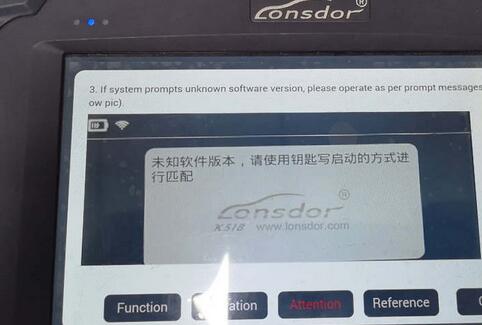
3.If system prompts unknown software version, please operate as per prompt message (see below pic.).
Part 2: Guide on program 2015- land rover all smart keys lost with Lonsdor k518S
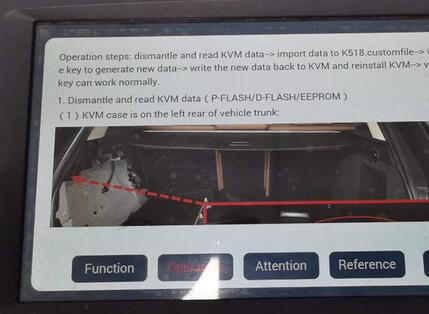
Dismantle and read KVM data
import data to K518.customfile
Write a workable key to generate new data
Write the new data back to KVM and reinstall KVM
Verify whether key can work normally.
1.Dismantle and read KVM data (P-FLASH/D-FLASH/EEPROM)
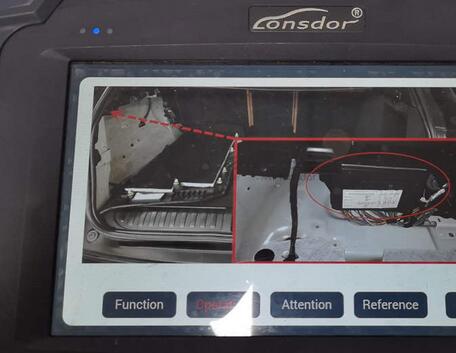
1). KVM case is on the left rear of vehicle trunk.
2.Use programmer to dismantle and read data (encrypted or unencrypted)
RFA encrypted (MC9S12XEQ384).
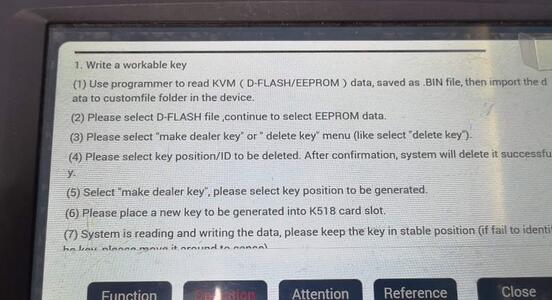
Write a workable key.
1). Use programmer to read KVM (D-FLASH/EEPROM) data, saved as .BIN filed, then import the data to customfile folder in the device.
2). Please select (D-FLASH file, continue to select EEPROM data.
3). Please select “Make dealer key” or “Delete key” menu (like select “delete key”)
4). Please select key position /ID to be deleted. After confirmation, system will delete it successfully.
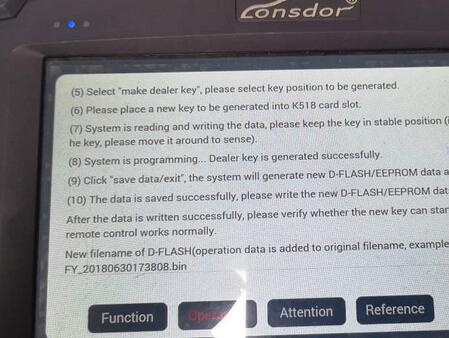
5). Select “Make dealer key”, please select key position to be generated.
6) Please place a new key to be generated into K518 car slot.
7) System is reading and writing the data, please keep the key in stable position (if fail to identify the key, please move it around to sense).
8) System is programming… Dealer key is generated successfully.
9) Click on “Save data / exit”, the system will generate new D-flash /eeprom data and save it.
10) The data is saved successfully, please write the new D-flash/eeprom data to KVM.
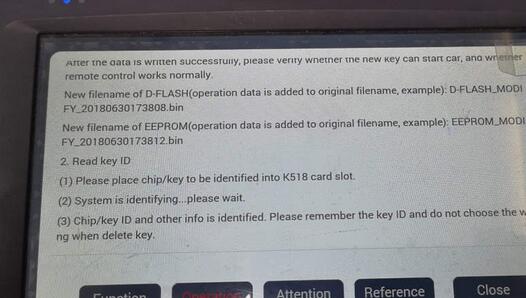
After the data is written successfully, please verify whether the new key can start car, and whether remote control works normally.
New filename of D-flash (operation data is added to original filename, example):D-flash_modify_20180630173808.bin.
After the data is written successful, please verity whether the new Key can start car, and whether remote control works normally.
New filename of D-FLASH(operation data is added to original filename, example): D-FLASH.M0D1 FY.20180630173808.bin
New filename of EEPROM(operation data is added to original filename, example): EEPR0M_M001 FY_20180630173812.bin
Read key ID
(1) Please place chip/key to be identified into K518 card slot.
(2) System is identifying…please wait.
(3) Chip/key ID and other info is identified. Please remember the key ID and do not choose the wrong when delete key.
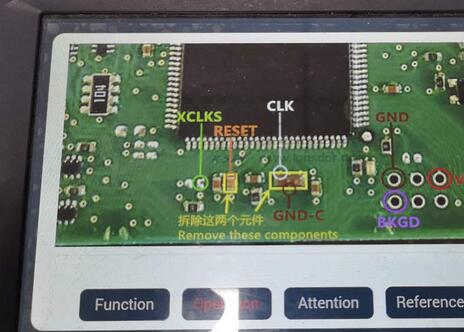
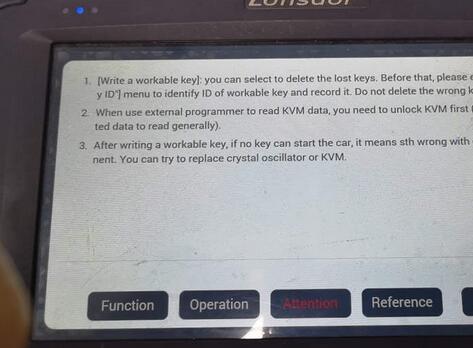
[Write a workable key]: you can select to delete the lost keys. Before that, please enter [Read key ID”] menu to identify ID of workable key and record it. Do not delete the wrong key. When use external programmer to read KVM data, you need to unlock KVM first (select encryp ted data to read generally). After writing a workable key, if no key can start the car, it means something wrong with certain component. You can try to replace crystal oscillator or KVM.
Someone said CG Pro is the cheapest option, make key from dump, only make keys from dump, not OBD! Downgrade with Chinese tools carries significant risk.
A collegue of mine had his CAS bricked by CGDI/CG PRO.
I’ve had a cas3+ bricked by downgrading via OBD with VVDI2.
Just solder on the wires and use file make key. It takes longer but is much safer. If you’re good at soldering you’ll have the wires soldered on in 5 minutes or less.